
I use Hugo to generate this blog and I love it, easy to use, easy to extend with shortcuts, I just love it. Most of the time I don’t use images, because that would require me to open an image editor, save the file, export it as a PNG, upload to my Minio server and use the image in the post. I wouldn’t mind the extra step or the fact I have to work with it, but opening an external program is not my life. Another downside, I want to change an image, or reuse given parts of an existing image can be hard like two years later. I know I have the Krita file somewhere, but I have no idea where, or I spend like 3 hours to find it.
One day I wanted to create a graph and I was about to start Krita, but suddenly realized I have a tool for that and it’s called LaTeX.
The story could end here, but not. My brain said “you can use this to create documents or images” and sure, I can. I started to experiment generating images, and it worked and I can manage the images in Git and that’s awesome. As an extra, I can generate images with transparent background, so when I include them in a post, the image “responds” to the active theme, the only thing I have to take care is to use good colors, so they are be visible both on light and dark background. I can still generate the same image from the same source file with filled background for open graph cover image.
Generate images
So I have a plan, build cover images with TeX. Writing the healer section in every single file would be silly, so let’s create a template first:
\documentclass[convert={density=300}]{standalone}

% Import commonly used packages.
\usepackage{tikz}
\usepackage{transparent}
\usepackage{fontspec}
\usepackage{xcolor}
\usepackage{graphicx}
\usepackage{anyfontsize}

\usetikzlibrary{calc, backgrounds}

% Set fonts, so it looks good.
\setmainfont{Umpush-Light.otf}
\setmonofont{Sauce Code Pro Nerd Font Complete.ttf}[
  Path = /home/efertone/.fonts/
]

% Ignore this now, we will come back later.
\graphicspath{{@@IMGPATH@@}}

% Generate colors
\definecolor{foreground}{RGB}{169, 169, 179}
\definecolor{background}{RGB}{41, 42, 45}

% Include a document here.
\input{@@TARGET@@}
Now we can create a script that finds all the .tex files and generates an
image with this template. To organize them, I have a tex directory in the root
of the repository that looks like this:
tex
├── 2020
│   └── 12
│       └── advent-of-code-2020-day-14
│           └── cover.tex
├── 2022
│   ├── 2022-02-02-go-1-18-generics
│   │   ├── cover.tex
│   │   └── foldl-vs-foldr.tex
│   └── 2022-02-04-how-i-generate-images-with-tex
│       ├── cover.tex
│       ├── hugo.png
│       ├── hugo.svg
│       └── readme.md
├── advent-of-vim
│   └── 2021
│       └── day12-01.tex
└── template.tex

8 directories, 9 files
How can we use the template with one of the .tex files? We can use sed
magic, that’s why we have a @@TARGET@@ in the template. First create a
temporary directory because it generates a lot of files while compiling and we
don’t need them.
# Create a temp directory.
tmpDir=$(mktemp -d)

# Delete the directory when we are done.
trap "rm -rf ${tmpDir}" EXIT

# Find all the .tex files, but ignore the template.
for file in $(find ./tex -name "*.tex" -not -name 'template.tex'); do
  # Extract the path, but without the tex/ top level directory.
  filePath=$(dirname $file | sed -e 's#^tex/##')
  # Generate a temp path from the original path.
  tmpPath="${tmpDir}/${filePath}"
  # Get the filename without the extension.
  fileName="$(basename ${file} '.tex')"

  # Create the full path under our temp directory.
  mkdir -p "${tmpPath}"

  # Generate the output pdf.
  #   Set output directory to our temp directory.
  #   Set job name to the filename (without extension).
  #     We need this because xelatex has no idea what is the filename
  #     from stdin.
  cat tex/template.tex \
    | sed -e "s#@@TARGET@@#${file}#" \
    | xelatex \
      -output-directory="${tmpPath}" \
      -jobname="${fileName}"
done
Now we have a nice PDF in out temp directory. Actually we don’t have that file
because we delete the whole directory at the end, but that’s fine. Why
xelatex and not latex? Because xelatex supports fancy external fonts
without extra hacks.
Now before we delete the directory, we want to convert the PDF into PNG. We have a nice tool to do that, it’s called ImageMagick. So let’s convert the PDF to PNG.
convert \
  -density 300 \
  "${tmpPath}/${fileName}.pdf" \
  -quality 90 \
  "${tmpPath}/${fileName}.png"
At the same time, we can generate an image with a solid background too.
convert \
  -density 300 \
  "${tmpPath}/${fileName}.pdf" \
  -quality 90 \
  -background "#292a2d" \
  -flatten \
  "${tmpPath}/${fileName}-fill.png"
The only thing left, to move images back before we delete the directory. We
have a tex directory for .tex files, we can use tex-build to keep all the
images. They can be anywhere, but because I use my Minio to host images, I do
not want to track them in git (it’s in my .gitignore).
mkdir -p "tex-build/${filePath}/"
cp "${tmpPath}/${fileName}.png" "tex-build/${filePath}/"
cp "${tmpPath}/${fileName}-fill.png" "tex-build/${filePath}/"
One big issue, it will generate all the images every time, that can be good
sometimes, but would be nice if we can define targets. Let’s update the find
arguments a bit:
scope="${1:-tex}"

if [[ "${scope}" != tex* ]]; then
  scope="tex/${scope}"
fi

for file in $(find ${scope} -name "*.tex" -not -name 'template.tex'); do
If the scope in the argument has not tex prefix, we add it because we know all
out .tex files should live under the tex directory.
Let’s the whole script with extra fancy messages:
#!/usr/bin/env bash

scope="${1:-tex}"
tmpDir=$(mktemp -d)

if [[ "${scope}" != tex* ]]; then
  scope="tex/${scope}"
fi

trap "rm -rf ${tmpDir}" EXIT

for file in $(find ${scope} -name "*.tex" -not -name 'template.tex'); do
  filePath=$(dirname $file | sed -e 's#^tex/##')
  tmpPath="${tmpDir}/${filePath}"
  fileName="$(basename ${file} '.tex')"
  mkdir -p "${tmpPath}"

  echo -en " \U1F550 ${filePath}/${fileName}.tex ..."

  cat tex/template.tex \
    | sed -e "s#@@TARGET@@#${file}#" \
          -e "s#@@IMGPATH@@#$(pwd)/tex/${filePath}/#" \
    | xelatex \
      -output-directory="${tmpPath}" \
      -jobname="${fileName}" \
      > /dev/null

  convert \
    -density 300 \
    "${tmpPath}/${fileName}.pdf" \
    -quality 90 \
    "${tmpPath}/${fileName}.png"

  convert \
    -density 300 \
    "${tmpPath}/${fileName}.pdf" \
    -quality 90 \
    -background "#292a2d" \
    -flatten \
    "${tmpPath}/${fileName}-fill.png"

  mkdir -p "tex-build/${filePath}/"
  cp "${tmpPath}/${fileName}.png" "tex-build/${filePath}/"
  cp "${tmpPath}/${fileName}-fill.png" "tex-build/${filePath}/"

  echo -e "\r \U2705 ${filePath}/${fileName}.tex -> ${filePath}/${fileName}[-fill].png"
done
Upload them
One of the reasons why we put the generates images in the tex-build with their
original path, we can upload them to S3/Wasabi/Minio/whatever with the whole
directory structure.
#!/usr/bin/env bash

pattern=${1}

for file in $(find tex-build -name "*.png"); do
  filePath=$(dirname $file | sed -e 's#^tex-build/##')
  fileName="$(basename ${file})"

  case "${file}" in
    *"${pattern}"*)
      ;;
    *)
      continue
      ;;
  esac

  mc cp "${file}" "spaces/static.efertone.me/blog/${filePath}/${fileName}"
done
I know, I can use mc mirror, but I have other plans for the future and it’s
easier to use mc cp now.
Some examples
Cover image | Go 1.18: Fold with generics
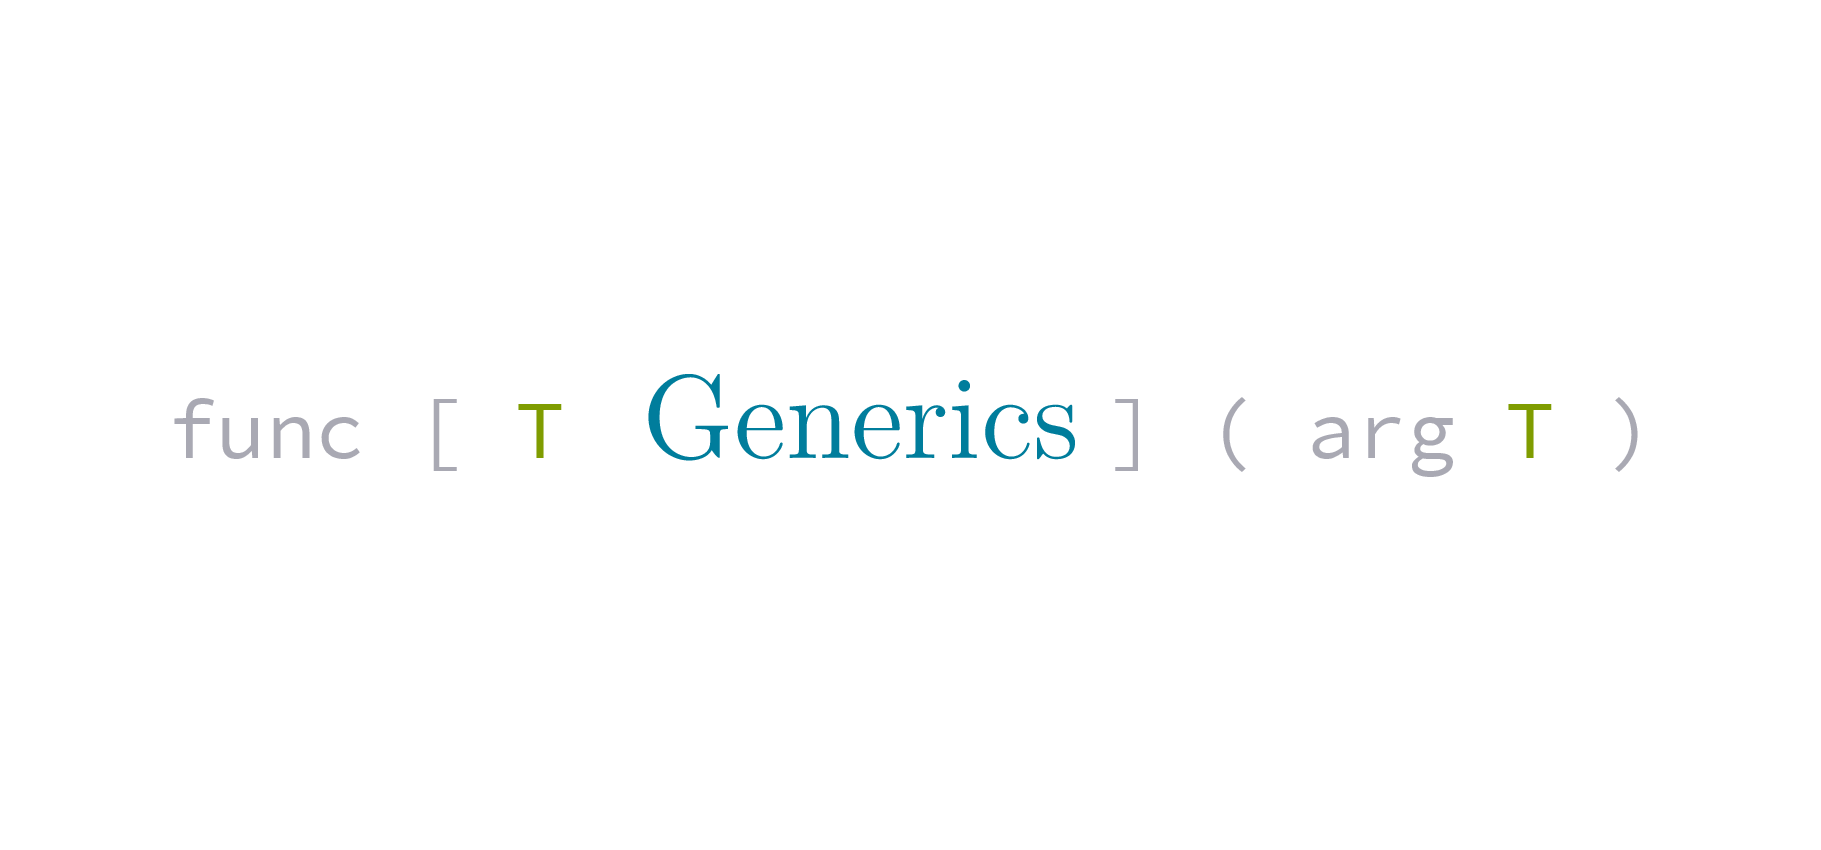
A nice cover image for the Go 1.18: Fold with generics:
\definecolor{blue}{RGB}{0, 125, 156}
\definecolor{mark}{RGB}{127, 156, 0}

\begin{document}
\begin{tikzpicture}[
  inner xsep=20pt, inner ysep=45pt,
  scale=1
]
  \node[text=foreground, scale=2]
    {
      {\tt func [ \textcolor{mark}{T} }
      \textcolor{blue}{\Large Generics}
      {\tt ] ( arg \textcolor{mark}{T} )}
    };
\end{tikzpicture}
\end{document}
Regexp explanation | Advent of Vim: Subtitution magic
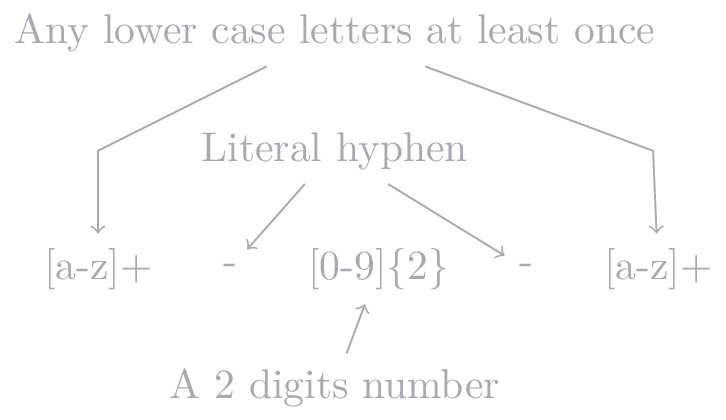
And here how I generated the regexp summary image in the Advent of Vim: Subtitution magic post.
\begin{document}
\begin{tikzpicture}[draw=foreground, text=foreground]
  \node at (0, 1) (1) {[a-z]+};
  \node[anchor=west, xshift=10pt] at (1.east) (2) {-};
  \node[anchor=west, xshift=10pt] at (2.east) (3) {[0-9]\{2\}};
  \node[anchor=west, xshift=10pt] at (3.east) (4) {-};
  \node[anchor=west, xshift=10pt] at (4.east) (5) {[a-z]+};

  \node at (2, 3) (1desc) {Any lower case letters at least once};
  \node at (2, 0) (3desc) {A 2 digits number};
  \node at (2, 2) (hyphen) {Literal hyphen};

  \draw [->] (1desc) -- (0,2) -- (1);
  \draw [->] (1desc) -- (4.7,2) -- (5);
  \draw [->] (hyphen) -- (2);
  \draw [->] (hyphen) -- (4);
  \draw [->] (3desc) -- (3);
\end{tikzpicture}
\end{document}
The cover image of this post
This post was the first when I wanted to embed an image and because I don’t wan
to copy over static images into the temp directory, I simply set the
\graphicspath to the original path of the .tex file, that way I can include
them with \includegraphics. So that’s why I have the
\graphicspath{{@@IMGPATH@@}} line in the template and the extra sed
substitution in the script.
\newcommand\epic{\fontsize{64pt}{64pt}\selectfont}
\definecolor{heartcolor}{RGB}{200, 147, 187}

\begin{document}
\begin{tikzpicture}[
  inner xsep=100pt,
  inner ysep=25pt
]
  \node[text=foreground] (latex) {\epic \LaTeX};

  \node[anchor=north, xshift=150pt] (hugo) at (latex.south)
    {\includegraphics[scale=0.3]{hugo.png}};


  \begin{scope}[yshift=-80pt, xshift=150pt]
    \draw[draw=none, fill=heartcolor] (0,0) .. controls (0,0.75)
      and (-1.5,1.00) .. (-1.5,2)  arc (180:0:0.75);
    \draw[draw=none, fill=heartcolor] (0,0) .. controls (0,0.75)
      and ( 1.5,1.00) .. ( 1.5,2)  arc (0:180:0.75);
  \end{scope}
\end{tikzpicture}
\end{document}